No Knead Whole Grain Seeded Artisan Bread
This post may contain affiliate links. Read the disclosure policy here.
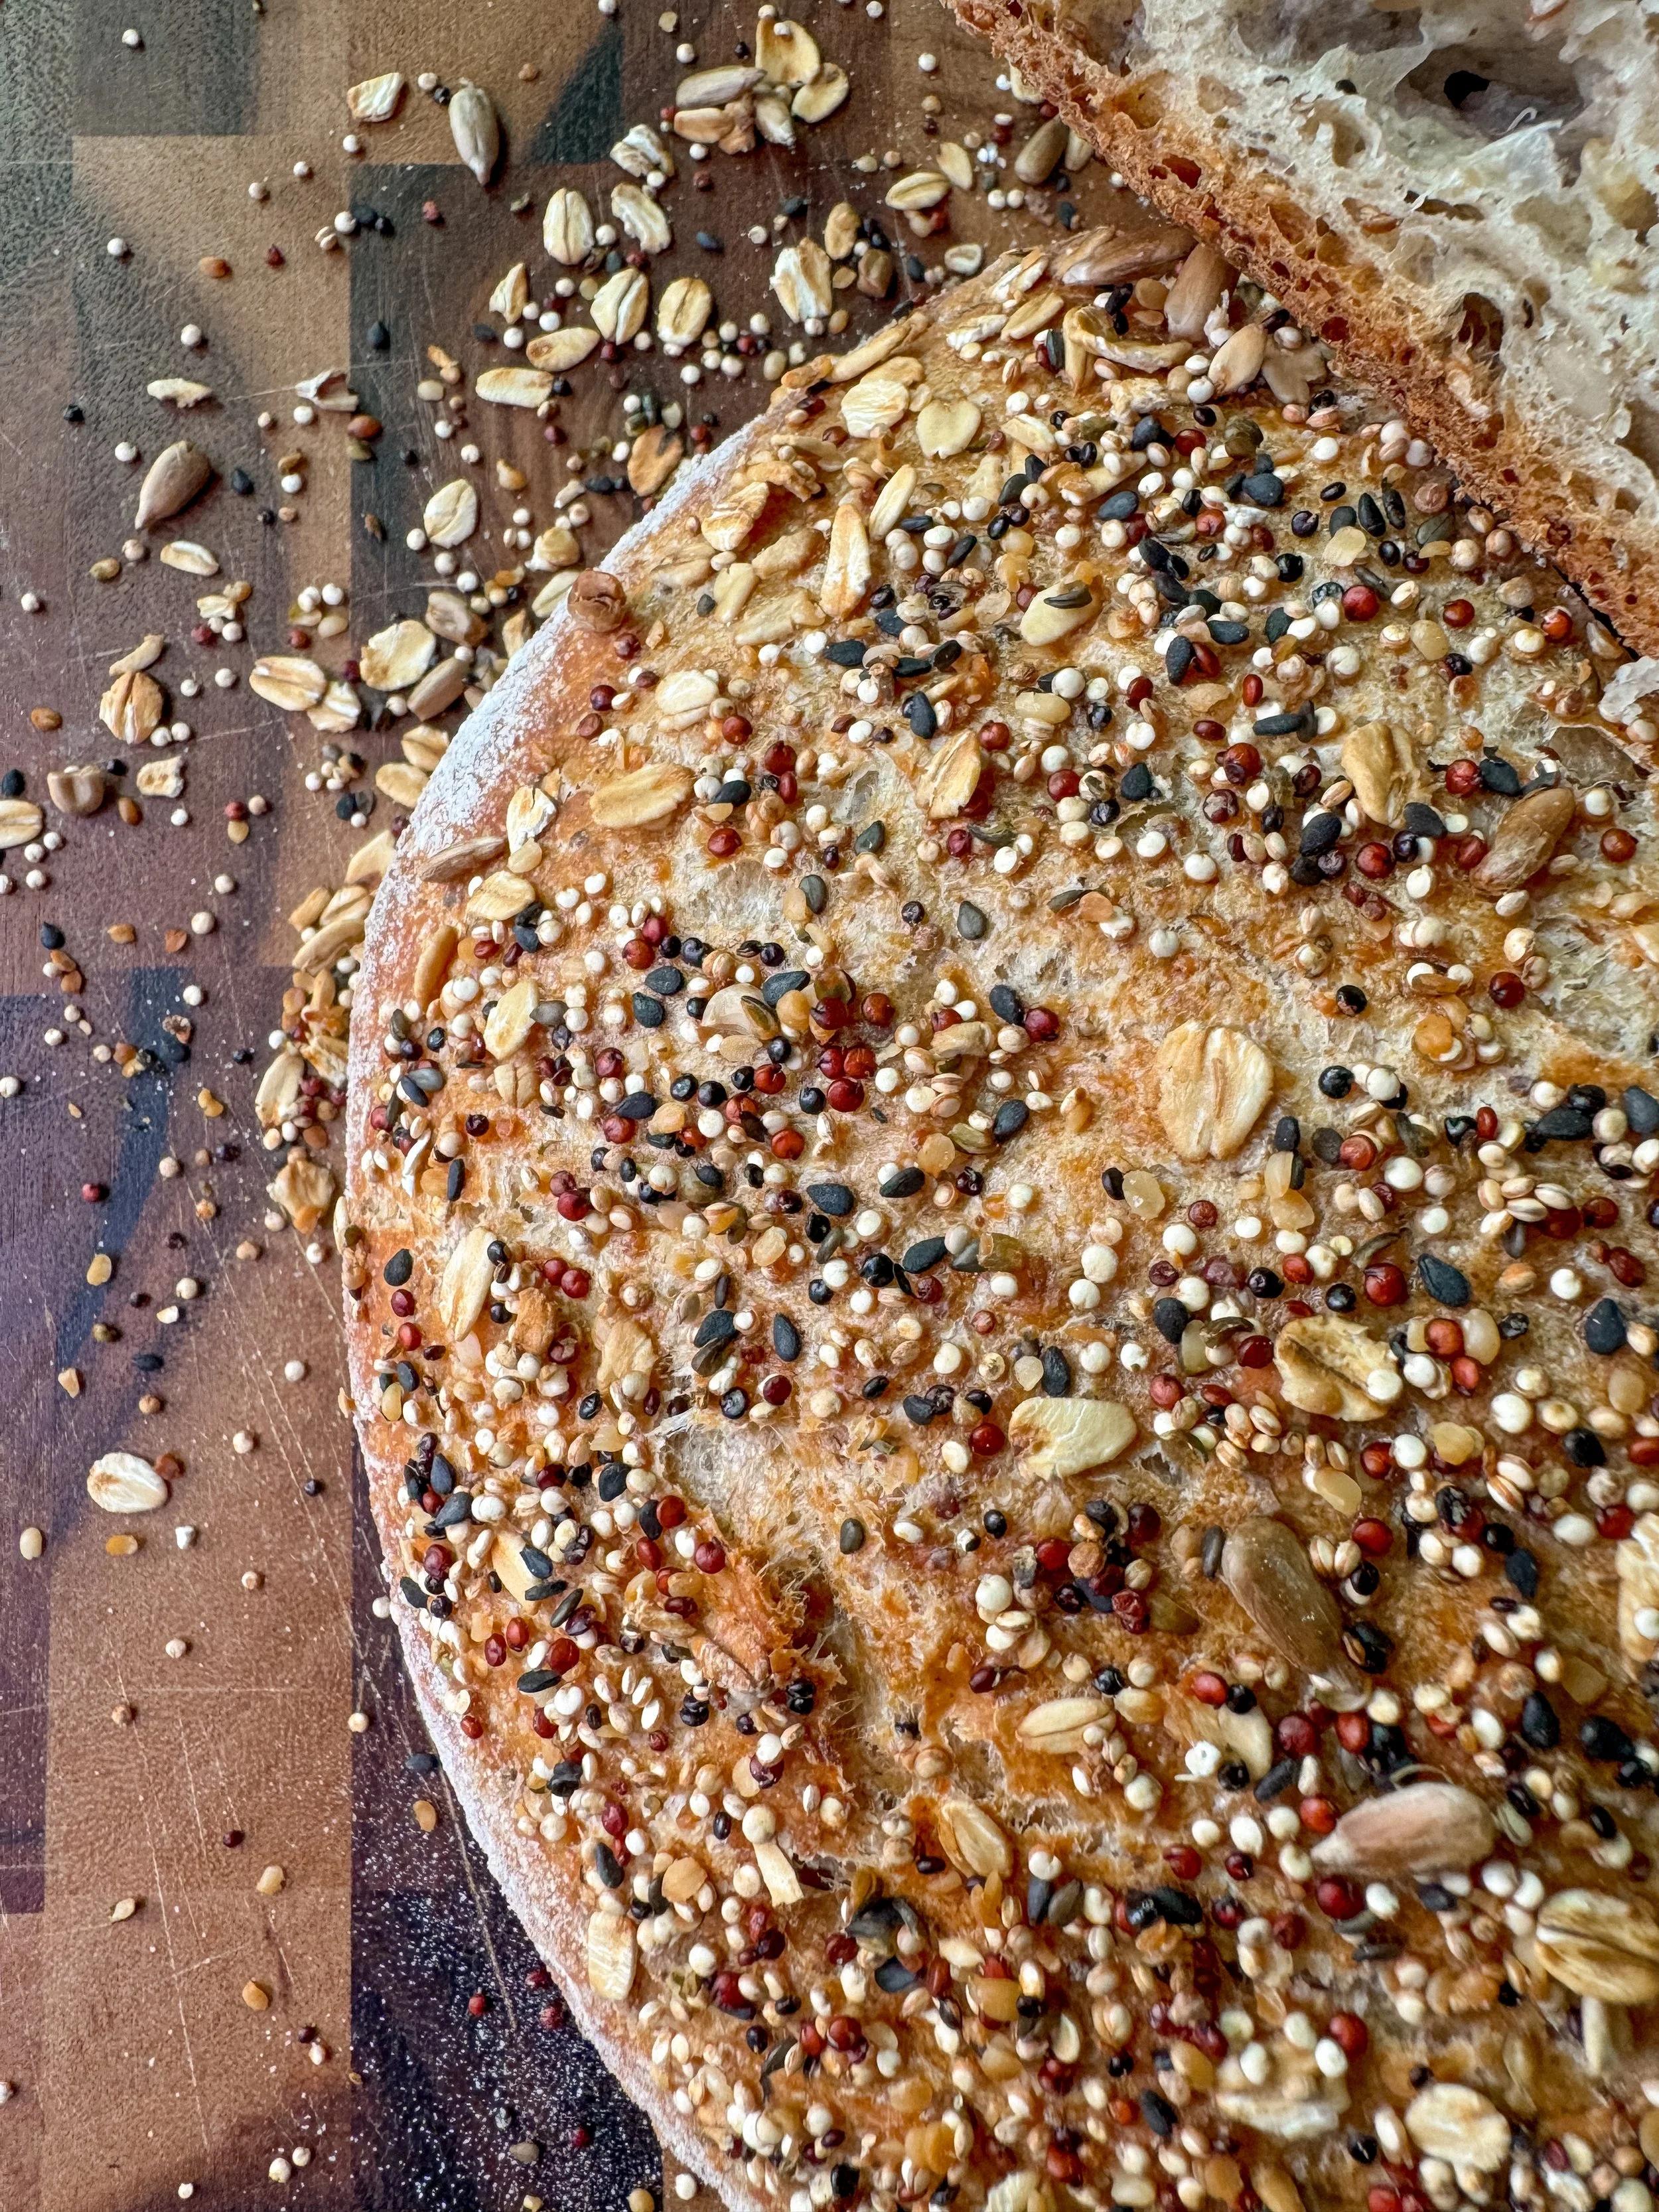
This seeded crusty bread adds extra fiber and protein to an everyday staple. Can be paired with savory or sweet toppings or for dipping in your favorite soup. All you need is a large bowl and a baking scale to make this crusty versatile bread. Makes two 2 lb loaves.
Lately, I’ve been trying to make healthier versions of things I already make, and I’m happy to say this bread is perfect amount of homemade bread coziness alongside wholesome nutritious additions.
Not too long ago I was scrolling and came across a reel of someone using beautiful seeded bread as a part of their dish. As soon I saw that I began craving seeded whole grain bread and started tinkering with some of my favorite bread recipes to see what I could get to work.
Just like the other recipe, you’ll need a small amount of patience and to learn a few new little techniques if this is your first time with a no knead loaf. From start to finish, it will take just under six hours (including if you only can bake one at a time). I realize that six hours is by no means a last minute “I want to make bread for dinner” type of recipe, but this recipe does make two loaves, and one can be easily stored in the freezer and revived in a thirty minutes turnaround time, which is just as good as a round trip to the grocery store for me.
While you do need one piece of special equipment, a dutch oven (two if you count a food scale), I have seen a few ways to get around needing one if you don’t have it already. Though I will say a good dutch oven is a workhorse in the kitchen. My dutch oven is used for tomato sauces, soups, jams and who chicken one pot meals. A friend of mine owns an extremely successful sourdough home bakery, and she uses the Amazon Basics Dutch oven, which is a very affordable option if you can’t afford one of the higher end brands.
Other reasons you’ll love this recipe:
The bread can be made in advance and frozen (I like to slice it before I freeze it so it’s easier to thaw, and I would slice it to eat in anyways)
The perfect bread for avocado toast or a grilled cheese
You can use it for sweet toasts and top with a smear of peanut butter, sliced bananas, granola, and honey
Every single soul I have ever met is thoroughly impressed by homemade bread
Pairs wonderfully with pasta, soup, stew, a charcuterie board, lasagna, and alongside salad
Omit the seeds and half the recipe for a whole wheat chewy pizza crust
You can also bake in a loaf pan (see directions below) for easier slicing for sandwiches
How you can serve this recipe:
In slices for all types of savory or sweet toasts
When serving as a bread alongside salad or a larger meal, I cut into slices and place in a basket at the center of the table alongside salted butter
An excellent bread to be cut into chunks for a charcuterie board
Croutons: If I ever happen to have leftover focaccia or loaves that has gone a bit stale, quickly run it under water in the sink and microwave for 30 seconds to soften. Cut into 1” cubes and toast in some butter, salt/finely shredded parmesan cheese in a frying pan until golden brown.
Special Equipment Needed
Large bowl: For mixing the dough
Food scale: To make sure you are accurately measuring the flour and water. If you do not have a food scale, use a ballon whisk or fork to sift the flour and gently scoop into a measuring cup then level by scraping the flat edge of the knife over the top. Do not shake to level.
Dutch oven with a tight fitting lid: To bake the bread
Pastry brush: For brushing the egg white on top of the dough for the topping
If you plan to be a regular bread baker, I have found purchasing a silicone bread baking mat has also been quite helpful and allows me to save on parchment paper
Step By Step Instructions with Pictures
Yield: Makes Two 2 lb bread rounds
Time: 6 hours start to finish including bake time if you bake one at a time
Storage: Leave on counter for the first 24 hours, then store in a plastic or sealable bag for up to three days. Can last longer if stored in the refrigerator
INGREDIENTS
750 grams (6 1/4 cup) all purpose flour
200 grams (1 2/3 cup) whole wheat flour*
1 teaspoon instant yeast**
24 grams salt (3 1/2 tsp)
1 tablespoon honey
850 grams (3 2/3 scant cup) lukewarm water
1/2 cup rolled oats
1/3 cup washed quinoa (I like tricolor for the look)
1/3 cup raw unsalted sunflower seed or pumpkin seeds
1 tablespoon flaxseed
2 tablespoons chia seed
2 tablespoons shelled hemp
2 tablespoons sesame seeds (I like to do half white and half black sesame seeds)
Rice flour, for coating the banetton
Topping (Optional):
2 tablespoons quinoa, rinsed
1/4 cup rolled oats
3 tablespoons sunflower seeds
1 tablespoon hemp
2 teaspoon sesame seeds
1 Egg white for brushing
**If you only have active yeast, activate in 1 cup of the water you were planning to add to the dough)
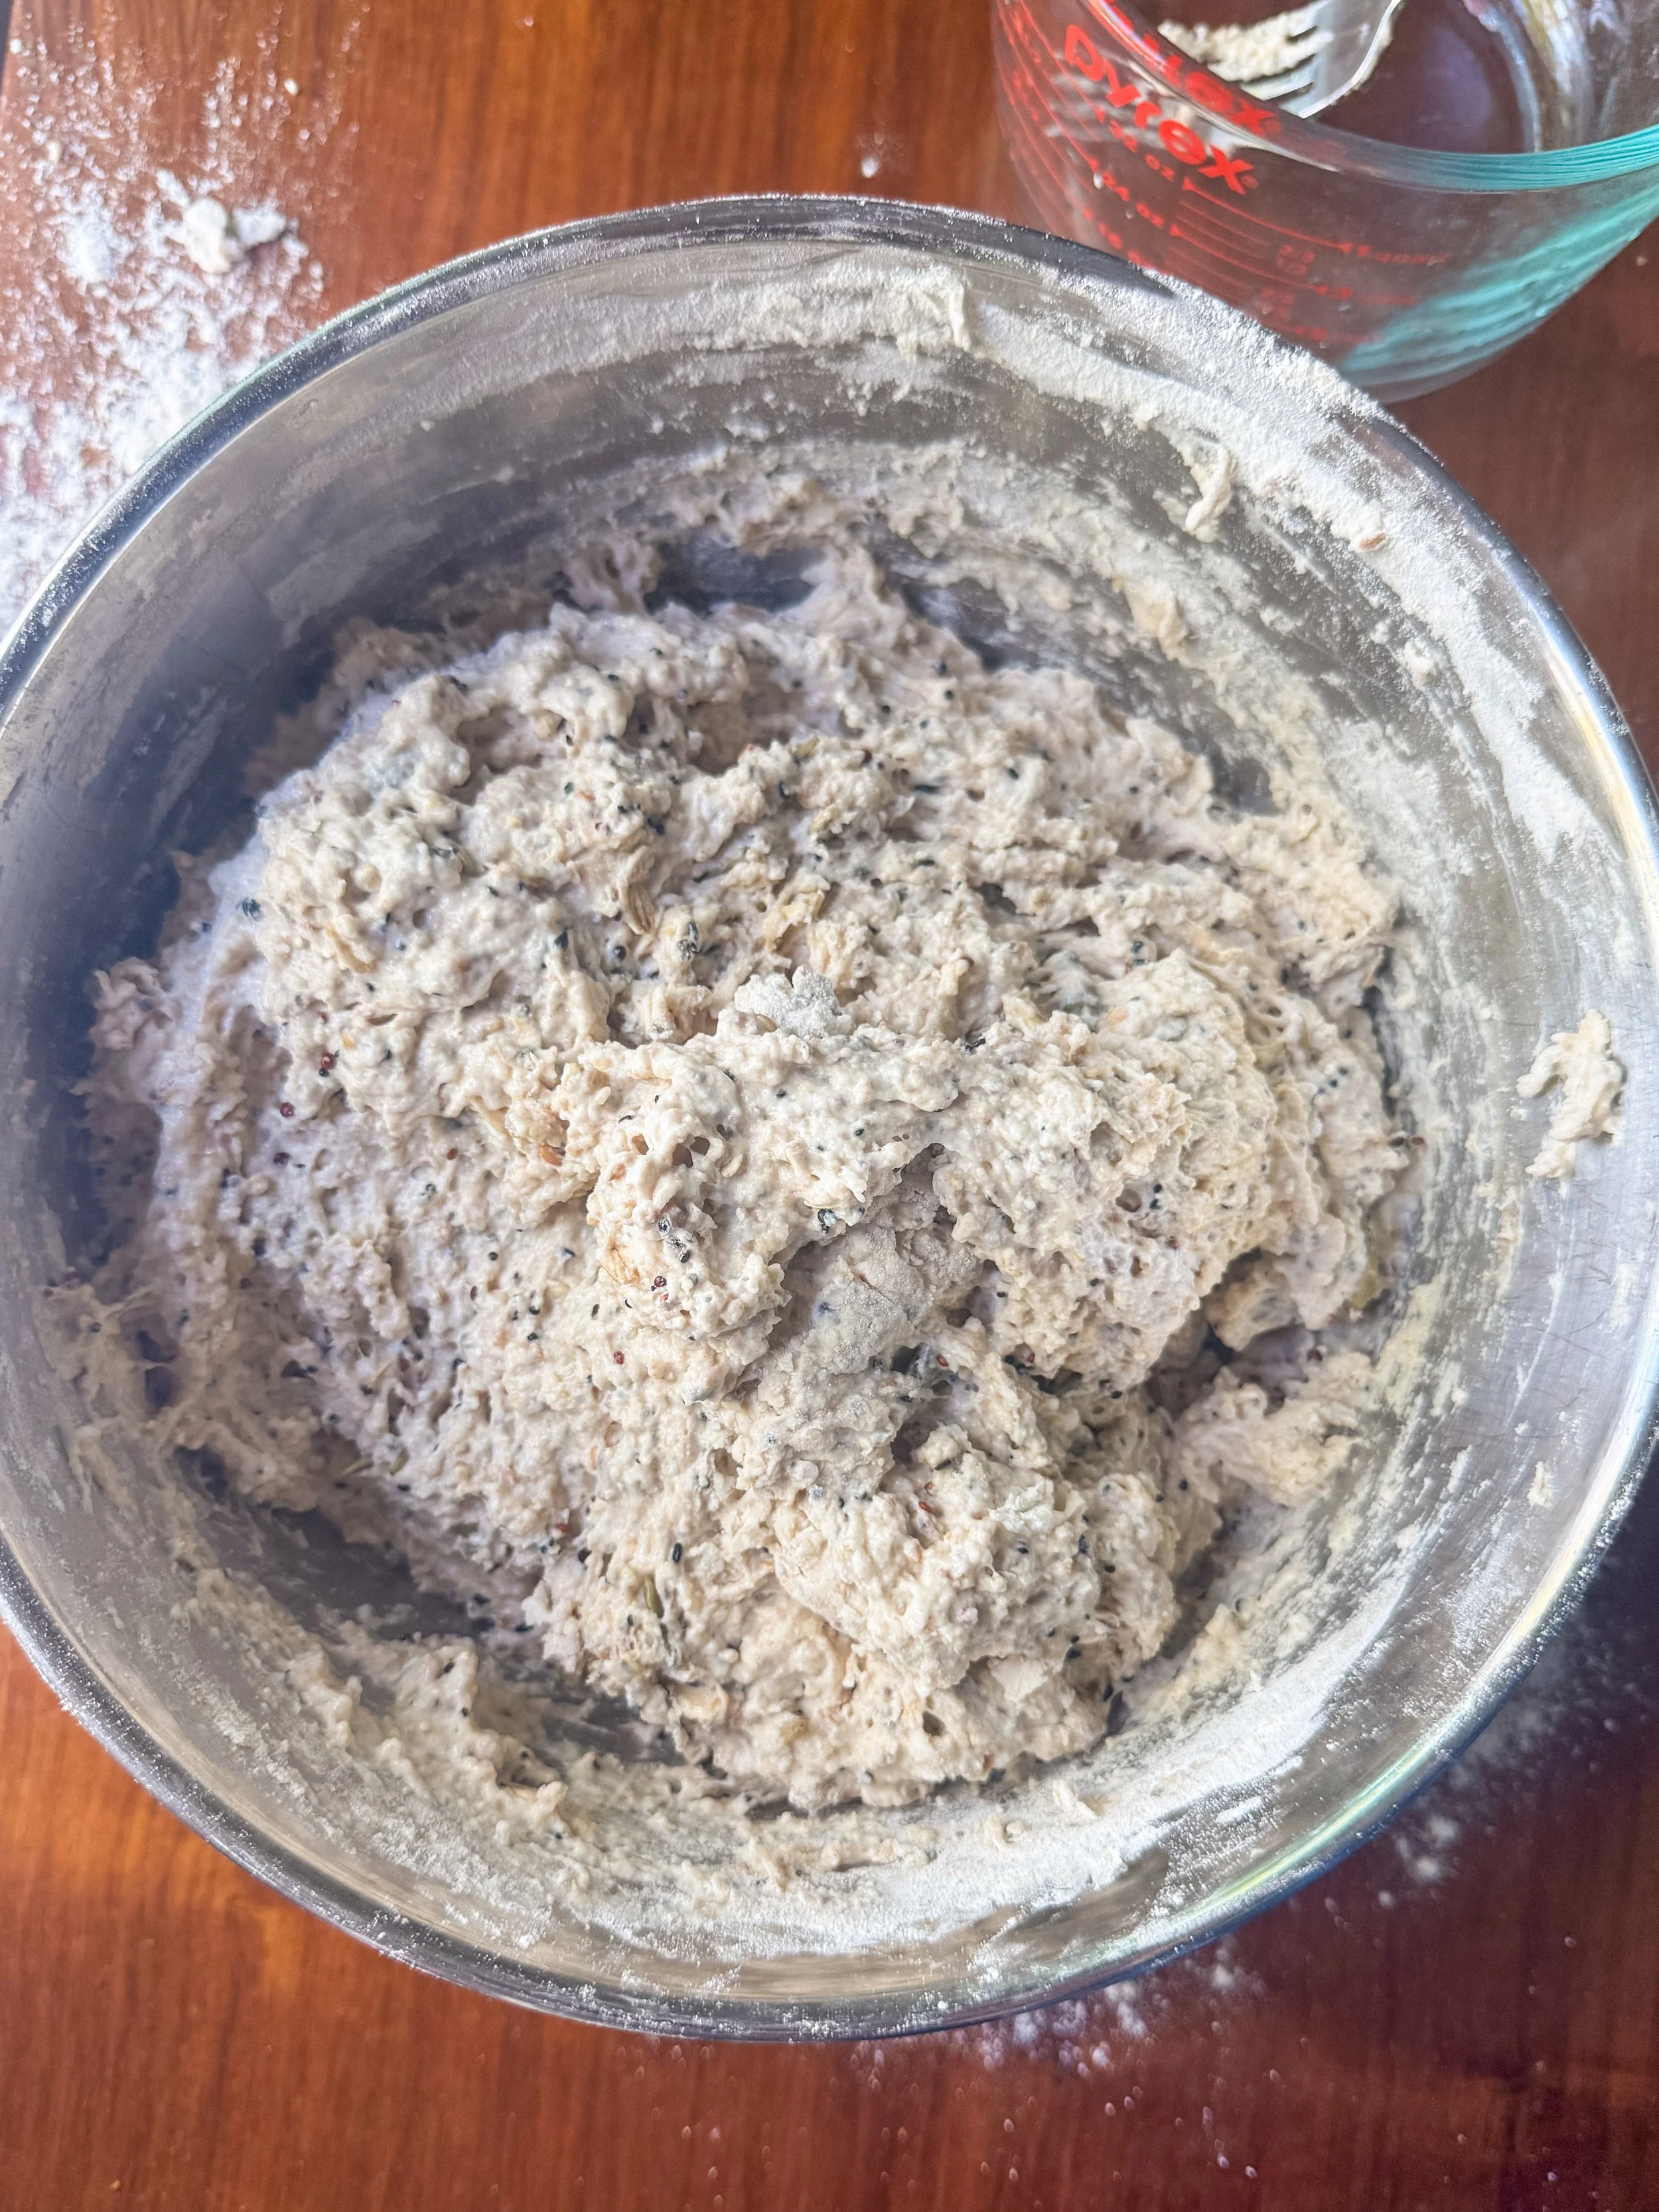
Mix the dough: Use a food scale if you have one for the most accurate result. Whisk flours, salt, seeds, and yeast (unless you’re using active dry yeast, then activate it in the water you will add to the dough first) in a large bowl. Add water and mix with a fork, then when it’s mostly combined, wet your hand and use it to grab underneath the dough and mix until you can’t find any dry flour at the bottom. You will probably need to wet your hand periodically to avoid dough from sticking to it.
Hydrolyze: Once it’s fully mixed, cover with a dry lint-free towel and let it hydrolyze for 25-30 minutes.
Fold: Now you will begin folding the dough to build tension. See the photos below, which illustrate the folds (this is from another recipe, but the technique is the sam). Grab underneath the dough and pull to the opposite side of the bowl. Turn the bowl a quarter of the way clockwise and repeat three more times, turning the bowl after each fold. You will do a total of four folds. Cover with the dish towel in between rests.


Rest & Fold: Wait 5 minutes and fold.
Wait 10 more minutes and fold.
Wait 30 more minutes and fold.
Long Rise: Now for the long rise, which will be over about three hours from initial mix. Shape before large bubbles start to develop on top of the dough, which is a sign it’s over proofed.


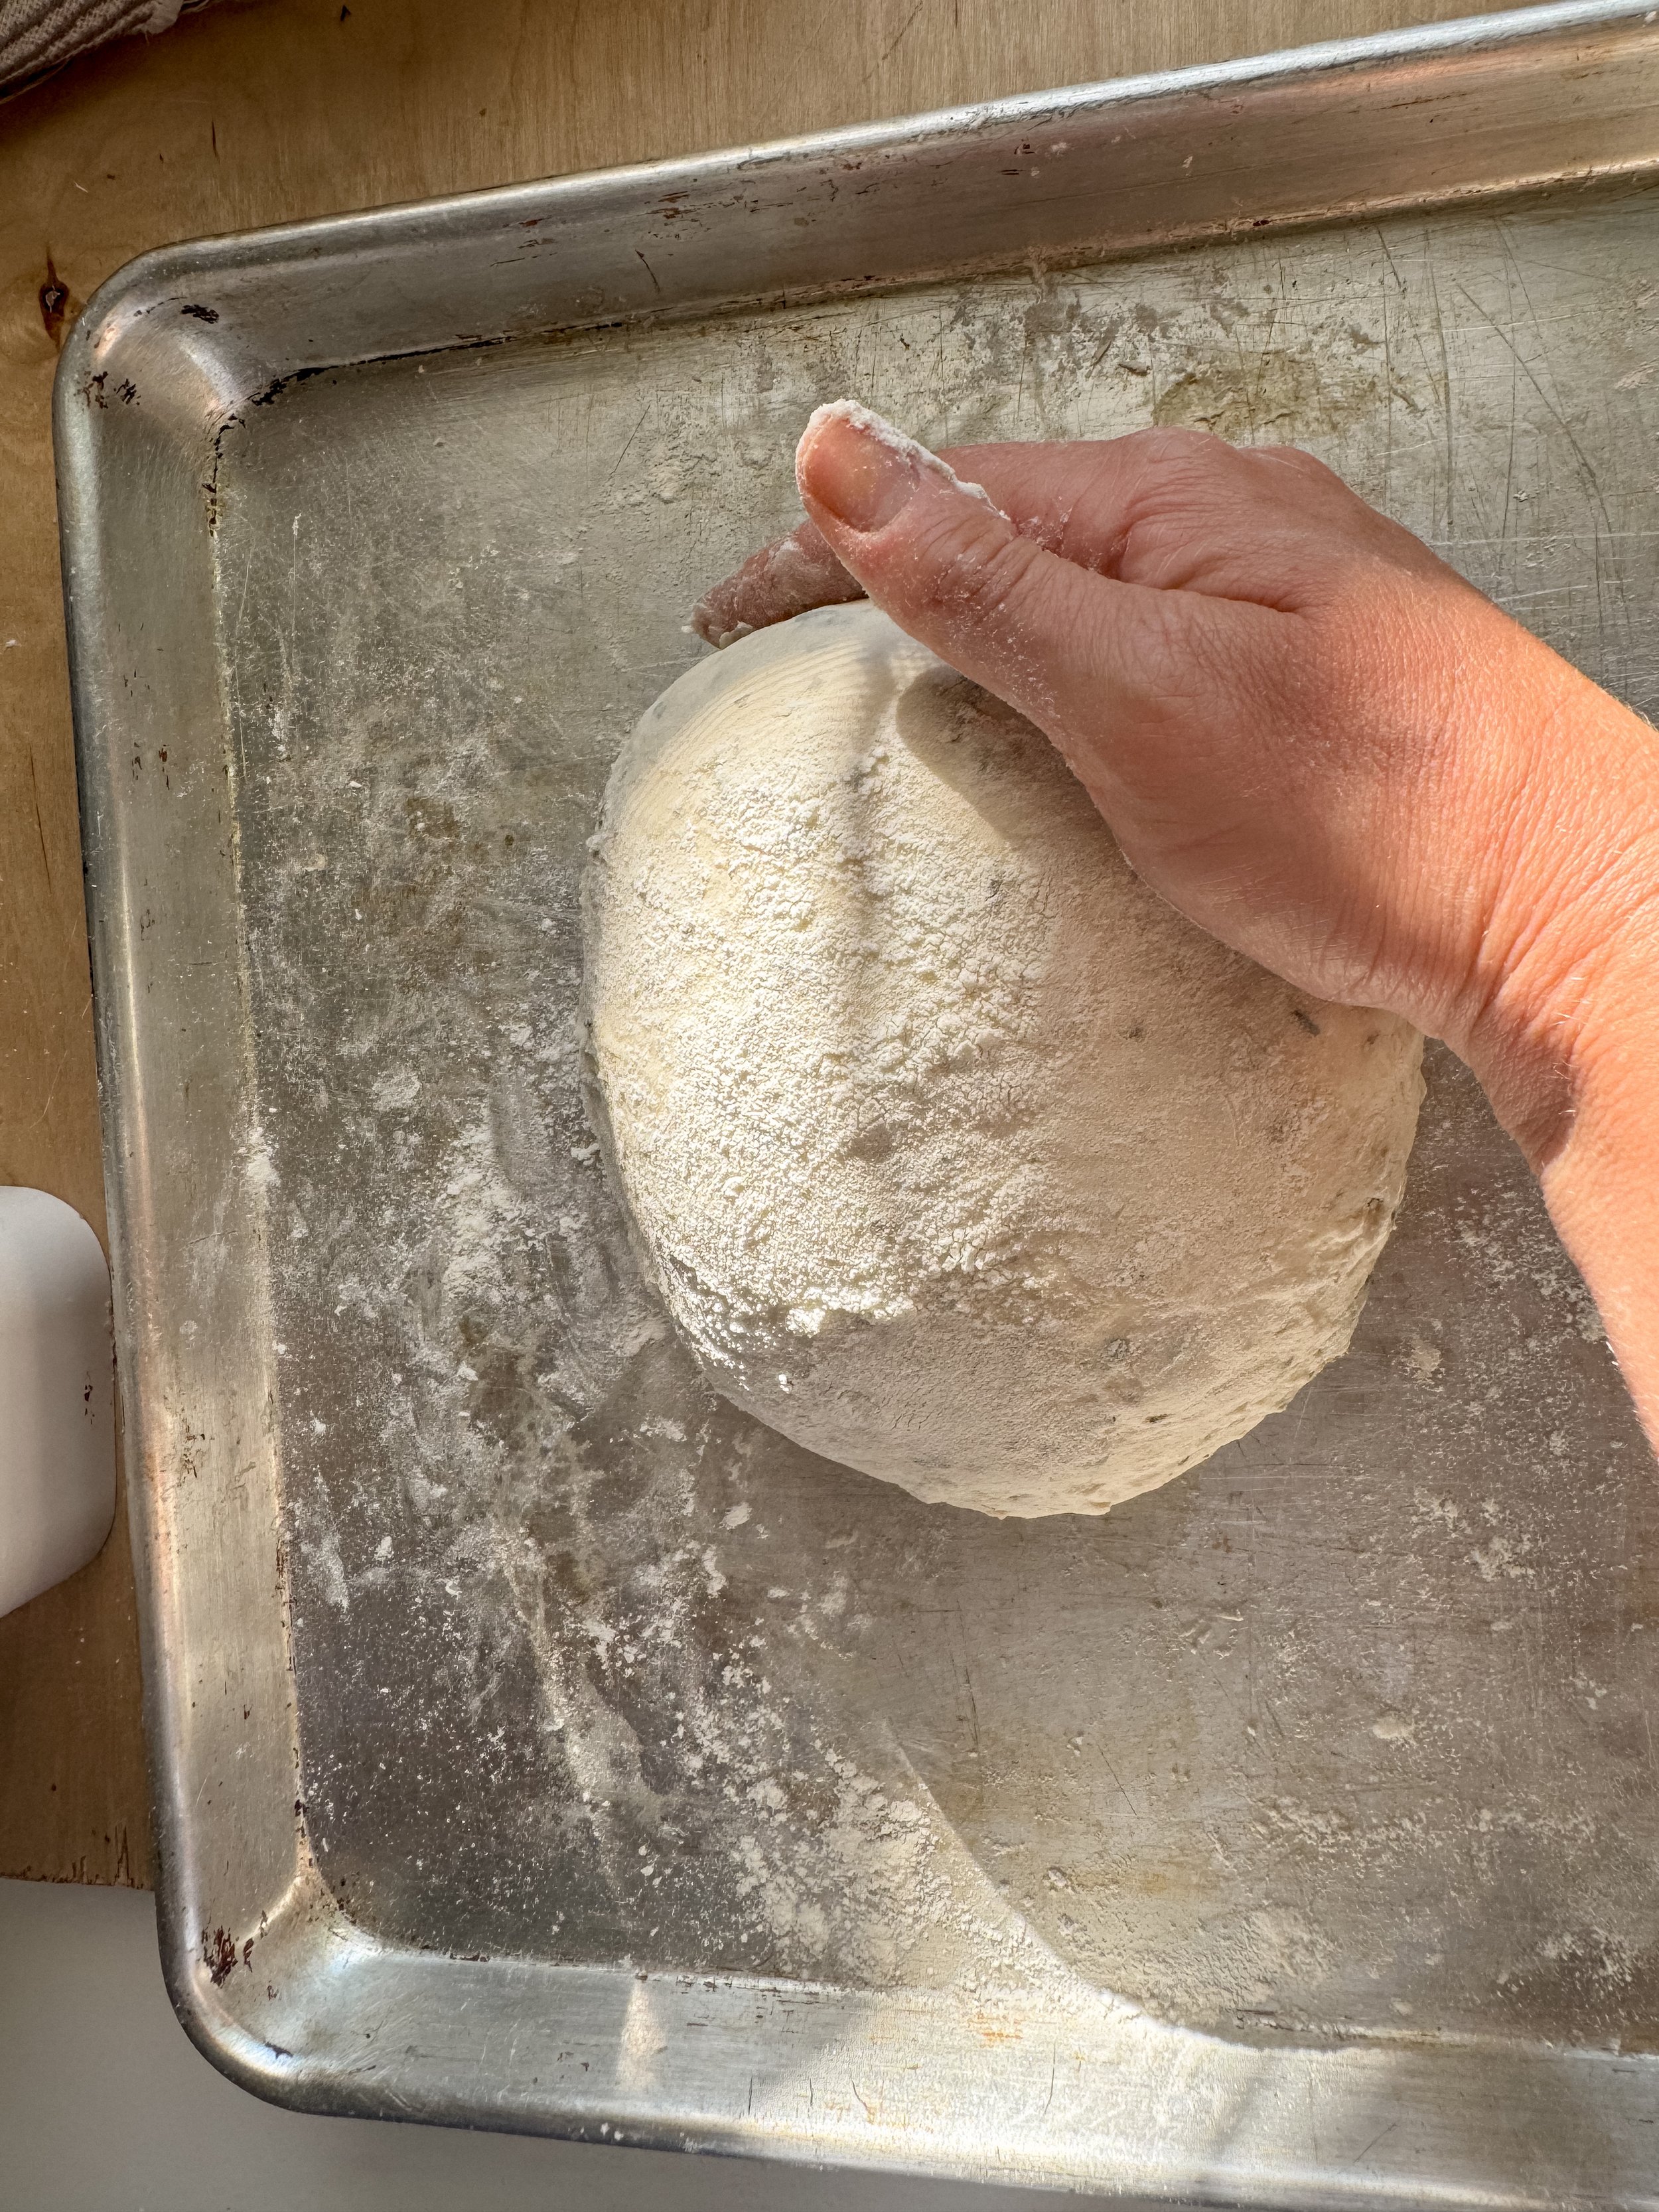
Prepare a banneton by covering the surface with flour. If you don’t have one, put a lint free dish cloth in a bowl & dust thoroughly with rice flour if you have it, if not all purpose does the job too. If you plan to bake in a loaf pan, scroll to the bottom of the directions to see how to do that.
Shape the dough: View the below photos from my herbed artisan bread recipe for a demonstration of the following techniques. Pour dough out onto a lightly floured surface, and shape into a circle. Sprinkle a trail of flour down the center of the circle, and use a dough scraper or knife to cut in half. Place half of the dough back in the mixing bowl so you have more room to work.
Take the first half of the dough and pull out from underneath to shape into a square. Then you’ll do the envelope fold by pulling the top down to the middle (see the photos), bringing the bottom up to the middle, and then bring in opposing corners one at a time.


Build tension in the dough: Flip the dough over and put it in front of you as far as your arms can reach then pull it towards you. Move it away and pull it towards you again. Rotating as you go to maintain the round shape. Repeat about 20 times to build tension in the dough and then place in prepared basket. And cover with lint free towel. Repeat with second part of dough.


Second Rise: If you only can bake one bread at a time, then put the first dough in the fridge and let the other one rise at room temperature. Bake the second loaf within 24 hours. Let the dough rise covered (I like to put them in the microwave) for 45 minutes while the oven and dutch oven are preheating.
Preheat the oven: Turn on oven to 475 and place both Dutch ovens (or just one if that’s all you have) in it to preheat. Make sure the rack is as close to the middle of the oven while still giving room for the Dutch oven to be in there with the lid on. From the time the oven is fully preheated to when you put the dough in, it should be about 45 minutes.
Place the dough in the dutch oven: Remove the dough from the banetton by flipping it out onto parchment paper cut to 10x10 inches (this will make for easier removal later). You can score the bread it if you like with a sharp knife or razor, but I notice that it doesn’t make much of a difference in the final bread. Carefully remove the lid from the dutch oven and gently drop in the dough still resting on the parchment paper. Place the lid back on the dutch oven and put it back in the oven.
Bake: Bake for 30 minutes. Carefully remove the lid and bake for 15 more minutes until golden brown. Let the bread cool on a wire rack. Wait 30 minutes or until it feels just warm to the touch before cutting. If you are baking a second loaf, let the Dutch oven and lid reheat in the oven for five more minutes before repeating the process.
To bake the bread in a loaf pan: Prepare a 8 x5” or 10”x5” loaf pan with a parchment sling. Do the envelope fold, and the next step to build tension. Then let relax for five minutes, and stretch the bread out into a rectangle by pulling from underneath. Fold the bread in on itself in thirds, then roll up on itself from the short side, and place in the prepared loaf pan.
To bake, place a pan filled with water (I use a pie pan) on the rack underneath the loaf pan in the oven for the first 25 minutes. Then remove and bake for an additional 15 minutes until golden brown. Let sit in pan for five minutes then remove to cool on a rack.

Seeded Whole Wheat Artisan Bread
This seeded crusty bread can be paired with savory or sweet toppings or for dipping in your favorite soup. All you need is a large bowl and a baking scale to make this crusty versatile bread. Makes two 2 lb loaves. No starter or mixer needed.
Ingredients
Instructions
- Mix the dough: Use a food scale if you have one for the most accurate result. Whisk flours, salt, seeds, and yeast (unless you’re using active dry yeast, then activate it in the water you will add to the dough first) in a large bowl. Add water and mix with a fork, then when it’s mostly combined, wet your hand and use it to grab underneath the dough and mix until you can’t find any dry flour at the bottom. You will probably need to wet your hand periodically to avoid dough from sticking to it.
- Hydrolyze: Once it’s fully mixed, cover with a dry lint-free towel (or store in the microwave with the door closed), and let it hydrolyze for 25-30 minutes.
- Rest & Fold sequence: Now you will begin folding the dough to build tension. (Look at the photos in the recipe description to see the motion of the folds.) Grab underneath the dough and pull to the opposite side of the bowl. Turn the bowl a quarter of the way clockwise and repeat three more times, turning the bowl after each fold. You will do a total of four folds. Cover with the dish towel in between rests.Wait 5 minutes and fold.
- Wait 10 more minutes and fold.
- Wait 30 more minutes and fold.
- Long Rise: Now for the long rise, which will be over about three to four hours depending on how warm your kitchen is from initial mix. Shape before large bubbles start to develop on top of the dough, which is a sign it’s over proofed.
- Prepare a banneton by covering the surface with flour. If you don’t have one, put a lint free dish cloth in a bowl & dust thoroughly with flour.
- Shape the dough: Pour dough out onto a lightly floured surface, and shape into a circle. Sprinkle a trail of flour down the center of the circle, and use a dough scraper or knife to cut in half. Place half of the dough back in the mixing bowl so you have more room to work.
- Take the first half of the dough and pull out from underneath to shape into a square. Then you’ll do the envelope fold by pulling the top down to the middle, bringing the bottom up to the middle, and then bring in opposing corners one at a time.
- Build tension in the dough: Flip the dough over and put it in front of you as far as your arms can reach then pull it towards you. Move it away and pull it towards you again. Rotating as you go to maintain the round shape. Repeat about 20 times to build tension in the dough and then place in prepared basket. And cover with lint free towel. Repeat with second part of dough. If you only can bake one bread at a time, then put the first dough in the fridge and let the other one rise at room temperature. Bake the second loaf within 24 hours.
- Preheat the oven: Turn on oven to 475°F (245°C) and place both Dutch ovens (or just one if that’s all you have) in it to preheat. Make sure the rack is as close to the middle of the oven while still giving room for the Dutch oven to be in there with the lid on. From the time the oven is fully preheated to when you put the dough in, it should be about 45 minutes.
- Place the dough in the dutch oven: Remove the dough from the banetton by flipping it out onto parchment paper cut to 10x10 inches (this will make for easier removal later). Carefully remove the lid from the dutch oven and gently drop in the dough still resting on the parchment paper. Place the lid back on the dutch oven and put it back in the oven.
- Bake: Bake for 30 minutes. Carefully remove the lid (steam will escape when you open it) and bake for 15 more minutes until golden brown. Let the bread cool on a wire rack. Wait 30 minutes or until it feels just warm to the touch before cutting. If you are baking a second loaf, let the Dutch oven and lid reheat in the oven for five more minutes before repeating the process. See notes if you want to bake in a loaf pan.
Notes
- To bake the bread in a loaf pan: Prepare a 8 x5” or 10”x5” loaf pan with a parchment sling. Do the envelope fold, and the next step to build tension. Then let relax for five minutes, and stretch the bread out into a rectangle by pulling from underneath. Fold the bread in on itself in thirds, then roll up on itself from the short side, and place in the prepared loaf pan. To bake, place a pan filled with water (I use a pie pan) on the rack underneath the loaf pan in the oven for the first 25 minutes. Then remove and bake for an additional 15 minutes until golden brown. Let sit in pan for five minutes then remove to cool on a rack.
- If you over proof the dough, I recommend shaping into rounds and immediately refrigerating while the oven is preheating, then baking straight from the fridge. You may not get the same rise, but the bread will still turn out pretty good.
- Adapted from Ken Forkish Saturday White bread recipe from Flour Salt Water Yeast: The Fundamentals of Artisan Bread and Pizza

